by Prakash Raja
OK folks, let’s get right to the process. It’s not hard at all. (Do observe a safe environment and safety while working.) To remove the front struts, you will need some basic tools:
• 16 mm Spanner
• 17 mm Spanner
• 22 mm Spanner
• 8 mm Alan Key
• wooden mallet (or small hammer)
• some clean work shop towels
• a pair of Nitrile or Latex gloves (I usually have a box in the garage.)
• Acetone – this will help to clean the piston shaft dry, because you will be wearing your clean pair of gloves to guide the piston back up the strut top upon replacing the strut, the piston will be very slippery as some LHM does spill when removing. This is unavoidable when removing the strut piston threaded portion out of the neck of the strut top.
• A flat Hydraulic jack and a bottle Hydraulic Jack. (If not both then one can suffice.)
• 2 wheel blocks
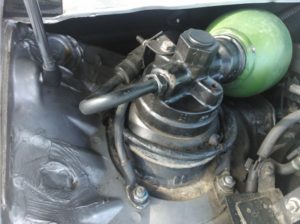
There is no need to remove the strut tops, hence you do not undo the HP pipe, nor do you remove the strut top mounts, leave these alone!
1) Place wheel blocks at the rear of the back wheels to stop a possible movement (since the front wheels will be off the ground and the hand brake only locks the front wheels).
2) Loosen the wheel bolts just a little whilst the wheels are still on the ground. This way it will be easier to remove them when the wheels are off the ground.
3) Start the car and place the height lever to the highest position, then go outside and either place couple of jack stands underneath on either side of the front sub(chassis)frame or use railway ties like I did. (i.e. 2 on top of the other either side will be enough to keep the XM front off of the ground, after the height lever is placed to the very low position and that the 12mm screw on the PRV is turned counter-clockwise one half turn, such that there is no more pressure in the system. At this point in time both the front wheels will be off the ground.)
4) To make sure that the pressure is no more, press the foot brake until it feels tight and or moving the steering side to side has released all the pressure in the system.
5) Loosen all the nuts on the piston, but do not remove them yet. (i.e. loosen the piston top – 22 mm, the lower arm – 16mm, the link that is attached to the strut body 16mm (could be 17 mm in some cases).
6) Also remove the Gaiter that is covering the piston, but only one side, either the top or where it fits around the strut body for now.
7) Remove the 22mm nut at the top the very last (you will see why latter)
8) After you remove the nut on the strut link that is attached to the strut body and loosen the 16 mm nut that is holding the lower strut body into the lower arm, also insert an 8 mm Alan key in the slit on the lower arm that is holding the lower strut. This is just to break it from its mold. You may have to use a bottle jack to place under the bottom of the lower strut end such that it will start to push the strut out of the socket of the lower arm. If not, then you could use a wooden mallet (or small hammer) to hit the eyelet of the strut where you would have removed the 16 mm nut for the drop link, hitting it slowly upwards until the strut body comes out of the lower horse shoe of the lower arm.
9) Now that the strut is free and in your hands, push the body of the strut upwards, such that it compresses the piston all the way inside the strut body. Once you can’t go any further up, (this means that you have reached its stop), now is the time to still keep it held in position there, keeping the wooden mallet (or a small hammer) at hand.
10) Remove first the 22 mm nut that is screwed on top of the piston at the strut top. Once the nut is out, all you have to do is to lightly tap tap tap tap with either the wooden mallet (or the little hammer) on top of the piston. This will release it downwards away from the tapered hollow of the strut top.
At this stage you will have had the slightly excess compressed LHM spewing out onto your hands and hopefully used some clean rags or shop towels to clean up along the way.
11) The replacement is the reversal of the above, only you will need to make sure that you clean the piston shaft with alcohol and or Acetone wearing a clean pair of Nitrile or Latex gloves. The gloves will help you to hold the piston shaft, when trying to insert it through the opening into and through the tapered hollow strut top mounting. This is the fun part as you will need patience! Don’t lose your cool; – it will come out of the top.
12) Quickly place and thread the 22 mm nut. Hand tighten for now, until you place the lower strut back in its position at the horse shoe on the control arm.
That’s the process. Cheers and good luck!


